RaceTrips User Guide
RaceTrips is the racing income, expense and tax tracker. Log your winnings, scan every receipt, track your miles, and turn a full season into tax-ready reports. This guide walks through every screen in the app, from your first trip report to the Schedule C summary you hand your tax preparer.
In this guide
- Getting Started — Welcome to RaceTrips · Create an account & sign in · Navigating the app · Your free trial & editions
- Trip Reports — Create a trip report · Record a rainout · Add prize money · Add expenses & scan receipts · Add travel miles · Review, edit & delete · Report Saved · Additional income & expenses
- Organize — Tags · Trip templates
- Insights & Reports — Season Snapshot: Insights · My Season · Alerts · Custom Report Builder · Tax Summary (Schedule C) · Emailing reports & receipts
- Account — My Profile · Upgrade to Premium & purchases · Sign out, delete account & help
- Reference — Icons & badges glossary · Frequently asked questions
Getting Started
Welcome to RaceTrips
Where in the app: Welcome screen and Product Tour
RaceTrips is a racing income-and-expense tracker built for the tax side of racing. Treat racing as a business (an LLC or DBA), record what you earn and spend on every trip, and RaceTrips turns it into a Schedule C style summary.
What RaceTrips does
- Tracks every trip. A Trip Report holds one race weekend: prize money, expenses, travel miles, finish positions and tags.
- Tracks income and expenses outside trips too. Sponsor money, merchandise sales, used-part sales, season pit passes and other stand-alone items.
- Logs receipts in a snap. Smart Scan reads a receipt photo with AI and fills in the amount, name and date.
- Shows your season. Cash flow, income and expense breakdowns, race results, average cost to race and how much taxable income you have offset.
- Gets you tax-ready. A year Tax Summary mapped to IRS Schedule C lines, plus a Custom Report Builder. The Tax Summary tab emails the report and a zip of the year's receipts; the Custom Report Builder has no email option.
The Product Tour
The eight-page tour plays automatically after you register. Tap Next (top right) to advance or Skip (top left) to jump into the app. You can also swipe between pages in either direction, and a row of dots shows where you are. On the last page both disappear and you tap Take me to the App. The pages are:
- Taxes suck. Don't overpay them. Racing is a business.
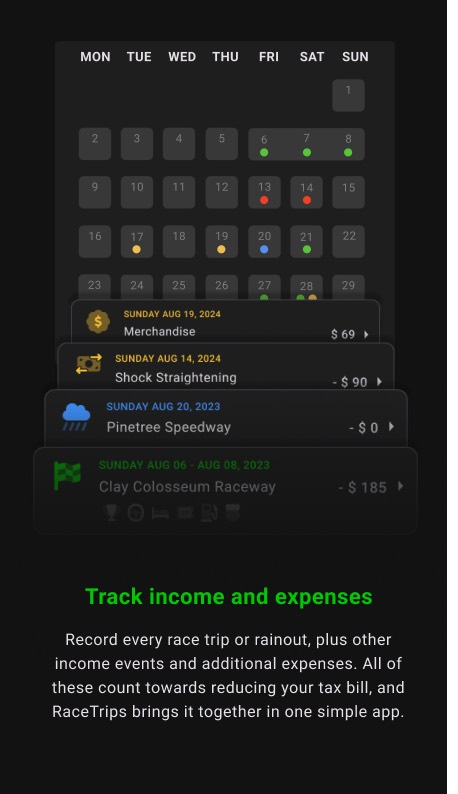
- Track income and expenses. Trips, rainouts, income events and additional expenses in one calendar.
- Log receipts in a snap. Smart Scan.
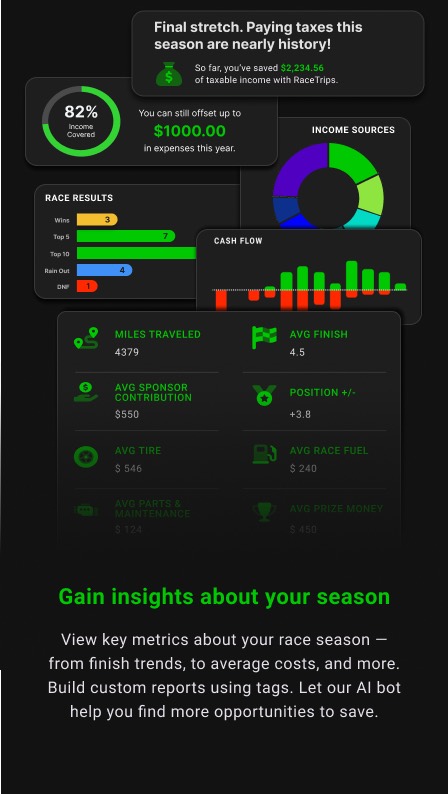
- Gain insights about your season. Key metrics, custom reports by tag, AI suggestions.
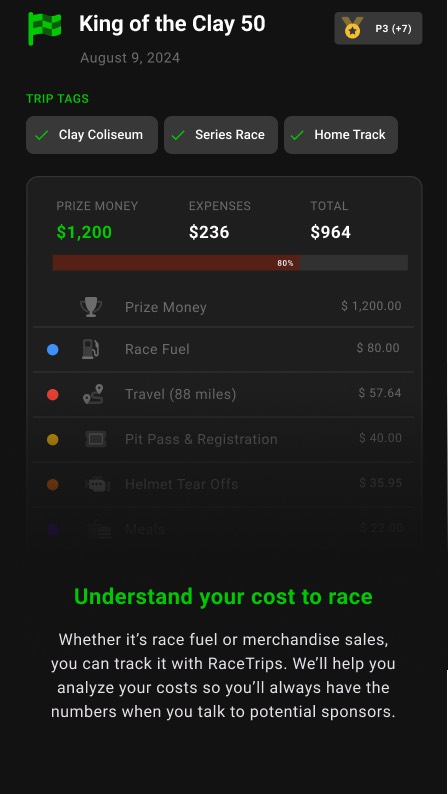
- Understand your cost to race. Per-trip prize money vs. expenses.
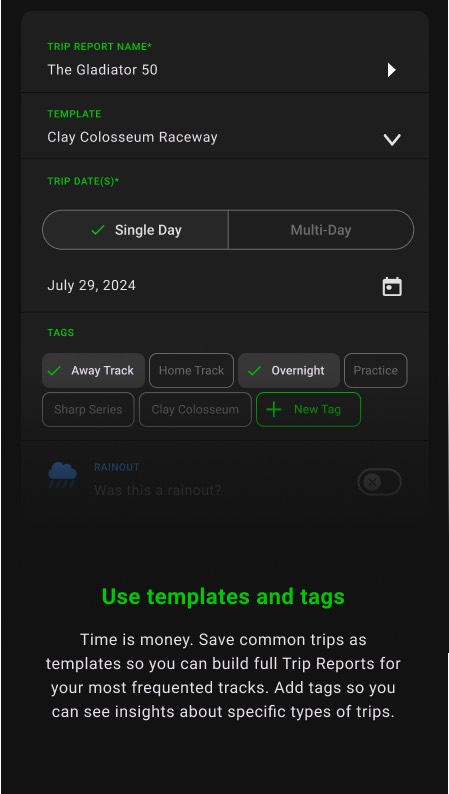
- Use templates and tags. Reuse common trips, tag everything.
- Keep more money in your pocket. Schedule C details at tax time.
- Try it before you commit. The free trial gives you 8 free Trip Reports.
Create an account & sign in
Where in the app: Welcome, Register, Login and Forgot Password screens
Create a free account with your name and email, or log back in. Your email address is also your username.
Register
- On the welcome screen ("Keep more of your racing prize money.") tap Register.
- Enter Your Name, Email and a Password (at least 6 characters). Tap the eye icon to show or hide the password.
- Optionally enter an Invite code (up to 10 characters) from a friend. Leave it blank if you do not have one.
- Tick I have read and agree to the Terms and Conditions. If you leave it unticked you see "You need to accept the terms".
- Tap Create Account. You are signed in and taken straight to the Product Tour.
If registration fails (for example the email is already in use) a Registration failed dialog shows the reason returned by the server.
Log in
- Tap Login on the welcome screen (or Already have an account? Login on the register form).
- Enter your E-mail and Password and tap Log In.
- A Login failed dialog explains any problem.
- Don't have an account? Create Account at the bottom of the login form switches to the register form.
Once you are logged in the app remembers you. The next launch shows the splash animation and opens My Race Trips directly.
Forgot your password?
- On the login form tap Forgot Password?
- Enter the email address of your RaceTrips account and tap Request password reset.
- A Password reset has been sent dialog appears; tap OK to return to the login screen and follow the instructions in the email. An unknown address shows Password reset failed.
Verify your email
After registering you should receive a verification email. Until you verify:
- My Profile shows a red Verify email bar with a Send Again button.
- The Upgrade to Premium screen shows "To continue, you need to verify your email" instead of the purchase list.
Navigating the app
Where in the app: Bottom bar, side menu and common controls
RaceTrips has four main screens on the bottom bar, a big green + button for adding things, and a side menu for everything else.
Bottom bar
| Tab | What it opens |
|---|---|
| Trips | My Race Trips: the month calendar and the list of Trip Reports. This is home. |
| Season | Season Snapshot: Insights and My Season stats for a year. |
| Reports | RaceTrips Reports: the Custom Report Builder and the Tax Summary. |
| Alerts | Trip Reports that are missing prize money or travel distance. A red badge shows the count. |
| + (green) | "Choose your action": new Trip Report, rainout, additional expense, additional income. |
Side menu (☰ top-left)
- Upgrade to RaceTrips Premium opens the purchases screen.
- Tax Report opens Reports on the Tax Summary tab.
- Manage Tags and Manage Templates.
- My Profile (also reachable from the round profile icon at the top-right of the Trips screen).
- Other Apps by RaceYear promotes RacePrep (maintenance tracking) with a Download button to the App Store or Google Play.
- Replay Product Tour.
- Tutorial Videos and Help and Feedback open raceyear.app pages in your browser (marked with an external-link icon).
- Sign Out.
- The footer shows the app version.
- The header at the top of the menu shows the RaceTrips logo beside a "brought to you by" panel: your sponsor's logo if your account has a sponsor promotion, otherwise the RaceYear apps banner.
Controls you will see everywhere
- Green check (✓) in the top-right saves a form.
- Green + in a line-item form saves and immediately clears the form so you can add another item ("Item Saved" toast).
- Trash icon deletes the item you are viewing. Every delete asks Are you sure? first and cannot be undone.
- Pencil icon edits the trip's basics (name, dates, tags).
- Pull down to refresh on the Trips, Trip Report, Alerts, Reports, Profile and Purchases screens. Season reloads when you change the year or return from the + button.
- A thin progress bar under the title bar shows while data is loading on some screens: Season, Reports, the Trip Report page, the trip and line-item forms, and My Profile.
- Selection pages. Fields such as Category, Start position, Finish position and Trip Template open a full-screen list. Tap a row to pick it; the selected row shows a filled green circle.
- Date pickers open the standard calendar picker. Trip dates can range from 2020 to 2030.
Your free trial & editions
Where in the app: Trips headline panel, Season and Reports lock panels, Upgrade to Premium
RaceTrips is free to try with a limited number of Trip Reports. Paid access is sold per tax year as a RaceTrips YYYY Edition.
The free trial
- New accounts start on the Free Trial. The trial includes 8 free Trip Reports (the exact number is set by the server and shown in the app).
- Every normal trip and rainout you create uses one trial report. Deleting a trip gives it back.
- The headline panel at the top of My Race Trips tracks your status:
- "Maximize your tax deductions. Start Your First Trip" before your first trip.
- "You have N FREE trip reports remaining. Get Premium" while reports remain.
- "Trial Completed. Unlock your season. Get Premium" once they are used up.
- The trial progress strip (a row of document icons, green for used, grey for remaining) appears in My Profile and on the purchases screen; the same strip in the upgrade dialog draws the used icons in the gold trial colour.
What happens when the trial runs out
- You can still add Trip Reports, expenses, income and miles. Your data keeps being recorded.
- Season Snapshot charts and stats are replaced by an Upgrade to unlock advanced stats panel. It reports how many trip reports you completed and how much taxable income savings you found. The taxable-income savings panel stays at the top of Insights, and My Season keeps the tag filter and the MY TRIP REPORTS month grid above the panel.
- Reports (Custom Report and Tax Summary) are replaced by Upgrade to unlock your tax reports.
- Tab labels in Season and Reports show a small lock icon: open while the trial is active, closed once it has expired. Tapping the lock icon on a chart opens the Ready to upgrade to Premium? dialog.
- If you have created more reports than the trial allows, Profile and Purchases show "You've created N more Trip Reports than your free trial allows."
Editions (paid years)
- Each edition unlocks one tax year (for example RaceTrips 2026 Edition) as a one-time purchase through the App Store or Google Play.
- Owning any edition ends the trial. Years you have not bought show a Get Ready for YYYY! panel in Season and Reports, and the Trips headline reads "New Year! Don't miss a trip. Get YYYY" for whichever year the calendar is showing.
- The year selectors in Season and Reports list the current year plus every year you can buy or have bought.
Trip Reports
Create a trip report
Where in the app: Trips → + → Create New Trip Report
A Trip Report is one race trip: a single day or a multi-day weekend. Create it first, then add prize money, expenses and miles to it.
Start a trip
You can start from three places:
- Tap the green + on the bottom bar and choose Create New Trip Report.
- Tap a day on the calendar. The same action sheet opens with that date pre-filled.
- Tap Start a Trip in the empty-month panel ("No trips this month, yet... Or pick a date from the calendar to get started"), or Start Your First Trip in the headline panel.
Move between months with the arrows beside the month name or by swiping the calendar. The list under the calendar is headed TRIP REPORTS with the month name; each row shows the trip's date in its type colour, the name, small icons for what you have logged, and the balance on the right.
Fill in the basics
- Trip Report Name* is required. Use the track or event name, for example "King of the Clay 50".
- Trip Template (optional). Pick a saved template to pre-load its expense items into the new trip. See Trip templates.
- Trip Dates*. Toggle Single Day or Multi-Day, then tap the date row (it reads "Select a Date" on Single Day and "Select a Date Range" on Multi-Day until you pick) to open the picker; tapping the already selected option also opens it. Multi-Day opens a range picker. A date is required; you will see "Please select a date or a date range" if you skip it.
- Trip Tags. Tap existing tag chips to select them, or + New Tag to create one on the spot. Selected chips show a green check.
- Rainout. Flip the switch if the trip was rained out. See Record a rainout.
Save
- Tap the green ✓. If another trip already exists on the start date, RaceTrips asks "This is already a trip on this date. Do you want to save another trip on this date?" Choose Yes, Create another Trip or Cancel.
- The new Trip Report page opens immediately so you can add prize money, expenses and miles.
Record a rainout
Where in the app: Trips → + → Record Rainout Day
A rainout is a trip you made that did not race. Recording it keeps your travel and expenses deductible and feeds the Rain Out count in your season results.
Log a rainout
- Tap + and choose Record Rainout Day (or tap a calendar day and choose it there).
- The Create form opens with the Rainout switch on and the name pre-filled as "Rain out". Rename it if you like, pick the date(s) and any tags.
- Save with ✓. The trip shows a blue rain-cloud icon in the list and a blue dot on the calendar.
Prize money on a rainout
- When you add prize money to a rainout, choose a start position of RAIN (or use the N/A or DNQ shortcuts). These positions set the amount to $0 and hide the finish position field.
Add prize money
Where in the app: Trip Report page → Add Prize
Prize money is the income side of a trip. Record each payout with its start and finish position so RaceTrips can compute results and averages.
Add a payout
- Open the trip and tap Add Prize. The form is headed ADD PRIZE MONEY / Prize Money Details with the trip name under the amount (expense forms read ADD EXPENSE / My Race Expense). When you reopen an item the heading changes to EDIT and the + button is replaced by a trash icon.
- Enter the amount in the big dollar field at the top (whole or decimal numbers).
- Prize Money Date* defaults to the trip's end date. Tap to change.
- Payment method: Check (the default) or Cash. When you reopen a payout to edit it the selector shows Check again, so re-select Cash if that is what you used before saving.
- Start position* opens the Select the Start Position list (P1, P2 and so on, plus DNQ, RAIN and N/A).
- Finish position* appears once you pick a real start position. Choose where you finished.
- Add optional Notes and a Receipt photo.
- Tap ✓ to save and return. (+ saves and clears the form for another payout; in the current version a second + can overwrite the payout you just saved, so use ✓ and Add Prize again to be safe.)
Prize money has no Category field; every payout is filed under Prize Money.
Did not qualify, rained out, or no race?
- Tap N/A - No Race Trip or Mark as DNQ under the amount. Both set the amount to $0, set the start position, and remove the finish position requirement.
- Choosing DNQ, RAIN or N/A as a start position does the same. Picking a real position afterwards clears the $0 so you must enter a value.
Where prize money shows up
- The trip header shows a finish position badge per payout, for example P3 (+7): finishing position and places gained or lost.
- The Summary tab shows PRIZE MONEY in green; the Details tab lists each payout.
- Season → My Season counts Wins, Top 5, Top 10, DNF and Rain Out from these entries.
Add expenses & scan receipts
Where in the app: Trip Report page → Add Expense
Expenses are the deductions. Enter them manually or let Smart Scan read the receipt for you.
Scan with AI or enter manually
Tapping Add Expense first asks how you want to start:
- Scan with AI. The camera opens right away. Take a photo of the receipt and RaceTrips scans it, filling in the amount, expense name and date. Review, adjust and save.
- Enter Manually. Opens an empty expense form.
The expense form
- Amount in the large dollar field at the top.
- Expense Name*. As you type, RaceTrips looks up names you have used before and auto-selects the matching Category if one is not chosen yet. Once you have picked a category yourself, typing no longer changes it. Smart Scan re-runs this lookup after it fills in the name.
- Category*. Opens the expense category list (pit pass, race fuel, tires, parts & maintenance, travel, meals, lodging, tolls, helmet tear-offs and more). Each has an icon and a color used throughout the charts.
- Expense Date*. Defaults to the trip's end date.
- Notes. Free text, multi-line.
- Receipt. Tap the picture area or the camera icon to take a photo, the gallery icon to pick one, or X to hide a photo you just added. To replace a photo, take or pick a new one; a receipt already saved on an item can be replaced but not removed.
Smart Scan from the receipt box
After you attach a photo, RaceTrips asks Scan the receipt: "Would you like to automatically scan this receipt with AI? This will overwrite the amount, name and date fields." Choose Smart-Scan or Don't scan. If you chose Scan with AI and closed the camera without taking a photo, you see No Image available for scanning and land on the empty form; attach a receipt and scan again.
Save
- ✓ saves and returns to the trip.
- + saves and clears the form ("Item Saved") so you can log the next receipt. It clears the date, category and positions too, and does not put the trip's end date back, so set them again for the next item. In the current version a second + can overwrite the item you just saved, so the reliable way to log several receipts is ✓, then Add Expense again for each one.
- The receipt photo is uploaded with the item and appears again on the item's form when you reopen it from the Details list. Receipts are also bundled into the yearly receipts ZIP (see Emailing reports & receipts).
Leaving without saving
Tapping the back arrow always asks before leaving. If required fields are missing you see Are you sure? There are errors on the form (shown in Red). with Continue editing or Discard. Otherwise you see Unsaved changes: Do you want to save or discard modifications. with Save or Discard changes.
Add travel miles
Where in the app: Trip Report page → TOTAL DISTANCE → Add Miles
Travel distance is a deductible expense at the IRS mileage rate. Type the miles or let RaceTrips calculate them between two addresses.
Add mileage
- Open the trip and tap Add Miles in the TOTAL DISTANCE panel.
- Type Miles to add (must be greater than 0), or fill in locations and calculate:
- Start location. Type an address, or tap the target icon to fill in "Current location" from GPS (grant location permission when asked; if it is denied the field stays empty).
- Destination location. For example "Grandview Speedway".
- Choose One Way (the default) or Round Trip.
- Tap Calculate. RaceTrips resolves the addresses, fills in the distance and replaces both location fields with the resolved names. If a location cannot be found, an error message appears under the button.
- Tap ✓ to save, or + to save and add another leg ("Miles Saved"). The miles field must be a number greater than 0, written with a decimal point rather than a comma; ✓ with an invalid value shows "Please fix the form errors". The + button does not run these checks, so use ✓ if you want the form validated.
The miles field is focused as soon as the screen opens, so you can type straight away.
Edit or remove miles
- Miles appear as a line in the trip's Details tab ("Travel (88 miles)" style). Tap it to edit the distance or locations; the trash icon that deletes the entry is in the title bar of the mileage form once it is open.
Review, edit & delete a trip report
Where in the app: Trips → tap a trip
The Trip Report page is the home for one trip: header, tags, action buttons, distance, and a Summary or Details view of every dollar.
Reading the page
- Header. Trip name, formatted date range, finish-position badges, and the trip-type icon.
- TRIP TAGS. Selected tags, read-only here; change them with the pencil. If the trip has none yet, tap + Add a Tag to jump to the edit form.
- Add Prize / Add Expense buttons.
- TOTAL DISTANCE with Add Miles.
- Summary tab. PRIZE MONEY, EXPENSES and TOTAL, a ratio bar: green while your prize money is at or below your expenses (showing how much of your expenses the prize money covers), red once prize money exceeds expenses, and totals per category. Tap anywhere on the Summary to switch to Details.
- Details tab. Every line item with its date, name and amount. Tap a row to edit it (expense, prize or miles).
- Save as a Template at the bottom. See Trip templates.
Edit the basics
- Tap the pencil in the title bar to open Edit Trip Report: name, single/multi-day dates and tags. Save with ✓.
Delete a trip
- Tap the trash icon. Confirm Delete in the "Do you want to delete this Trip Report? This cannot be undone!" dialog. Deleting a trip removes all its line items and returns the trial report if you are on the trial.
Edit or delete a line item
- Open the item from Details. Change any field and tap ✓, or tap the trash icon and confirm "Do you want to delete this Prize Money?" (or Expense, Additional Income, Additional Expense, or "this mileage item"). This cannot be undone.
- Pull down on the Trip Report page to reload it after making changes elsewhere.
Report Saved, reminders & AI suggestions
Where in the app: Appears when you back out of a trip after adding or changing items
A quick recap of what the trip just did to your taxable income, what is still missing, and suggestions from RaceTrips AI.
What the dialog shows
- Report Saved! with "You just increased / decreased your taxable liability by $X". Adding expenses decreases it (shown in green); adding prize money increases it.
- DON'T FORGET TO… reminders: Tap a reminder to jump straight to that form.
- Add Your Travel Distance when the trip has no miles.
- Add Your Prize Money when the trip has no prize entry.
- RACETRIPS AI SUGGESTS cards. Based on your trips, the AI proposes expenses you may have forgotten (for example a pit pass). Tap the card's button to open the expense form with that category pre-selected. Tap X to dismiss the suggestion for this trip; it fades out and will not return.
- Done returns you to the trip list. The X in the corner, or a tap on the dark background, closes the dialog and stays on the trip.
Turn AI suggestions on or off
- In My Profile, toggle AI INSIGHTS: View AI Insights Messages and save.
Additional income & expenses (outside a trip)
Where in the app: Trips → + → Log an Expense (No Trip Report) / Log additional Income (Not Prize Money)
Not everything happens on a race weekend. Log season pit passes, parts, sponsor checks, merchandise or used-part sales as stand-alone entries.
Log an additional expense
- Tap + and choose Log an Expense (No Trip Report).
- Choose Scan with AI or Enter Manually.
- Fill in the amount, Expense Name, Category and Expense Date (all required; the date row shows the placeholder "[DAY MON DD, YYYY]" until you pick one, unless you started from a calendar day, which pre-fills that day), plus notes and receipt, then ✓.
Log additional income
- Tap + and choose Log additional Income (Not Prize Money). Examples: T-shirt sales, sponsorships, used part sales.
- Choose Scan with AI or Enter Manually.
- Fill in the amount, Income Name, an income Category (sponsor money, resell used parts, point fund, merchandise, other) and the Income Date (all required), the Payment method (Check / Cash), notes and receipt.
- Envelope icon (income only). Saves the item and opens Send Receipt via Email. Enter an address and tap Send to email a receipt confirming the payment, handy for sponsors.
- ✓ saves.
How they appear
- Each entry shows in the month list with its own icon: an orange money-transfer icon for Additional Expense, a gold dollar badge for Additional Income, and matching colored dots on the calendar.
- Tapping one opens a page headed Additional Expense or Additional Income listing just that item. Tap the item to edit it. There is no pencil icon on these pages; the trash icon deletes the entry.
- Deleting the item deletes the whole entry.
- They do not count toward your free trial reports, and they roll into Reports and Season totals. The Completed Trip Analysis includes fuel, tires, parts and season pit passes from these entries but excludes merchandise, used-part sales, point fund and sponsor income.
Organize
Tags
Where in the app: Side menu → Manage Tags; also in Create/Edit Trip, Season and Reports
Tags classify your trips: track name, series, car owner, home vs. away, overnight, practice. Filter Season stats and Custom Reports by tag.
Create tags
- In Create or Edit Trip Report, tap + New Tag, type a name and tap Add. The tag is created and selected on that trip.
- In Manage Tags, tap + New Tag to add one without a trip.
- Tag names must be unique. A duplicate shows "Could not add tag: Tag already exists".
- The New Tag dialog has only an Add button; tap outside it to close without adding.
Apply tags to a trip
- On the Create/Edit form, tap chips to select or deselect. Selected chips show a green check.
- On the Trip Report page, + Add a Tag opens the edit form when the trip has no tags yet.
Remove a tag everywhere
- In Manage Tags, tap the X on a chip. RaceTrips warns "This is an active tag on one or more Race Trip Reports. Deleting this tag cannot be undone and will remove it from all Reports." Choose Yes, Delete Tag or No, cancel.
Use tags in analysis
- Season → My Season: tick FILTER BY TAG and select chips to limit the trip counts, race results and analysis to matching trips.
- Reports → Custom Report: tick FILTER BY TAG to limit income and expense totals to tagged trips.
Trip templates
Where in the app: Trip Report page → Save as a Template; Side menu → Manage Templates
Templates copy a trip's expense items so your next trip to the same track starts pre-filled.
Save a trip as a template
- Open a completed trip and tap Save as a Template.
- Create a Trip Template opens with the template's Template Name* pre-filled from the trip. Rename it (for example the track name).
- Under COPY EXPENSE DETAILS TO TEMPLATE, every line item is ticked. Tap an item to untick it and leave it out.
- Tap ✓. A "Template created" toast confirms.
- Backing out instead asks Are you sure? If you continue, your changes are not saved: Keep editing or Discard the Template. Always leave with ✓ or the on-screen back arrow; the device back gesture skips this prompt and can leave an unfinished template saved.
Use a template
- On Create New Trip Report, tap TRIP TEMPLATE → Select a trip template (optional) and pick one. When you save the trip, the template's items are copied into it with the new trip's date. Edit amounts afterwards from the Details tab.
- Templates are only offered when creating, not when editing.
Manage templates
- Side menu → Manage Templates lists your templates. Tap the trash icon and confirm with Ok ("This will permanently delete this template.").
- With no templates saved the screen is simply empty. Templates can only be created from a trip, using Save as a Template.
Insights & Reports
Season Snapshot: Insights
Where in the app: Bottom bar → Season → Insights tab
The Insights tab answers one question: how much taxable racing income have you offset this year, and where is the money going?
Pick a year
- Tap the year dropdown in the title bar. The list shows the current year and every year you own or can buy.
Panels
- Money bag panel. A status headline from the server (for example "Final stretch. Paying taxes this season are nearly history!") and "So far, you've saved $X of taxable income with RaceTrips."
- YOUR PROGRESS. A ring showing % Income Covered (expenses as a share of income) and "You can still offset up to $X in expenses this year."
- YOUR SEASON. INCOME, EXPENSES and TOTAL for the year.
- CASH FLOW. Twelve months: green income bars above the line, red expense bars below, and a white cumulative cash line.
- MY EXPENSES. A donut of expenses by category. Tap a slice to see its icon, name and percentage in the centre. The list below shows each category's colour, share and amount.
- MY INCOME. The same donut and list for income categories.
- Empty states. A chart with no data reads "No expenses to display" or "No income to display". Before you have any income the money-bag headline reads "No income yet". The cash-flow chart labels months by their first letter and draws a dashed line at zero.
Trial and edition states
- During the trial the five stat panels (not the money bag) carry a small open-lock icon. Tap it for the Ready to upgrade to Premium? dialog with your trial progress.
- After the trial expires, everything below the money bag is replaced by Upgrade to unlock advanced stats.
- A year you have not purchased shows Get Ready for YYYY! with an Upgrade to Premium button.
Season Snapshot: My Season
Where in the app: Bottom bar → Season → My Season tab
My Season is about racing, not just money: how many trips, how you finished, and what an average trip costs.
Filter by tag
- Tick FILTER BY TAG and select chips. Every panel below recalculates for trips carrying any selected tag. Untick to see the whole season.
Panels
- MY TRIP REPORTS. A 2×6 grid of months with the trip count in each. Past months are outlined green, the current month is solid green, future months (and every month of a future year) are grey and show no number until they have trips. Tap a month to open My Race Trips on that month. The header shows TOTAL: N.
- RACE RESULTS. Horizontal bars for Wins, Top 5, Top 10, DNF, Rain Out and similar buckets, counted from your prize-money finish positions. The panel appears only once you have prize-money entries.
- COMPLETED TRIP ANALYSIS. AVG PRIZE, AVG COST and TOTAL TO RACE, then stat boxes such as Miles Traveled, Avg Finish, Position +/−, Avg Tire, Avg Race Fuel, Avg Parts & Maintenance, Avg Prize Money. Averages use completed trip reports plus season-level fuel, tires, parts and pit passes; merchandise, used-part sales, point fund and sponsor income are excluded.
Trial and edition states
Lock icons during the trial. After the trial expires you still see Filter by tag and My Trip Reports; Race Results and Completed Trip Analysis are replaced by Upgrade to unlock advanced stats. Unpurchased years show Get Ready for YYYY!.
Alerts
Where in the app: Bottom bar → Alerts
Alerts lists Trip Reports that are incomplete so nothing deductible slips through.
What gets flagged
- MISSING PRIZE MONEY. A trip with no prize entry (add one, or mark it N/A, DNQ or RAIN).
- MISSING TRAVEL DISTANCE. A trip with no miles logged.
- Alerts covers Trip Reports in the current calendar year.
Using the list
- The Alerts tab shows a red badge with the number of open alerts.
- Each card shows the trip's date, name and its warning rows. Tap a card to open the trip and fix it. The list refreshes when you come back.
- When everything is complete you see a thumbs-up: No issues found with your Trip Reports!
Custom Report Builder
Where in the app: Bottom bar → Reports → Custom Report tab
Slice your income and expenses by any date range and by tag.
Build a report
- Open Reports. The Custom Report tab is selected.
- Optionally tick FILTER BY TAG and select tags.
- Under SELECT DATE RANGE choose Year to Date, Last Year, Last Month or Custom. Last Month is the first to last day of the previous month; Year to Date and Last Year are calendar years. Custom keeps whatever range the screen is already showing, which is January 1 to December 31 of the current year on a freshly opened Reports screen; tap either date to open a range picker (any range from 2020 up to today). If a custom range spans two years and either is locked, the lock panel is shown for the whole report.
- The report updates immediately.
Reading the report
- Total Income (green) and Total Expenses at the top.
- An Income panel and an Expenses panel, each headed by the date range and the total, listing every category with its icon and amount.
Trial and edition states
- Trial expired for any year in the range: Upgrade to unlock your tax reports.
- A year in the range not purchased: Get Ready for YYYY!
Tax Summary (Schedule C)
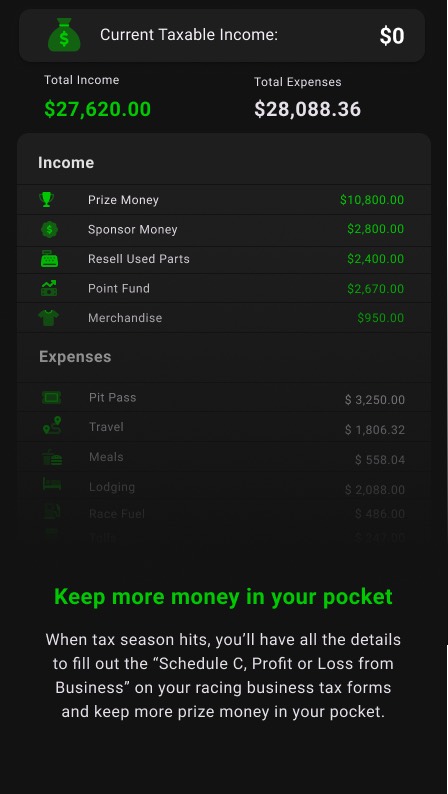
Where in the app: Bottom bar → Reports → Tax Summary tab, or Side menu → Tax Report
The Tax Summary maps your year onto IRS Schedule C (Profit or Loss From Business) so you or your preparer can fill the form line by line.
Choose the year
- Tap the year dropdown beside "Tax Summary"; the subtitle reads "IRS Schedule C Summary" and the screen title is RaceTrips Reports. Opening Reports from the side menu's Tax Report item lands on this tab directly. The page shows "Loading..." until the data arrives.
What is on the page
- Schedule C header panel. An explanation of the schedule from the server.
- Part I – Income. Lines such as Line 1 Gross receipts or sales, with your income categories (prize money, sponsor money, point fund, merchandise, resold parts) and a Line total.
- Part II – Expenses. One block per Schedule C line (car and truck expenses, travel, meals, supplies, repairs and maintenance, and so on). Each shows a Line N badge, the line name, the categories that roll into it with their full amounts, and the Line N Total.
- Partial deductions. Lines that are not 100% deductible (for example meals at 50%) show "50.00% deductible" in amber and a Deductible 50.00% row with the amount removed.
- Footer. Notes on how to use the numbers, plus two buttons: Email Tax Summary and Email Receipts of this year.
Trial and edition states
- Trial expired: Upgrade to unlock your tax reports, which explains that the Tax Summary "is what you'll need when you file your taxes with the IRS" and that the Custom Report Builder "allows you more flexibility to drill into your spending".
- Year not purchased: Get Ready for YYYY!
A note on taxes
RaceTrips organizes your racing income and expenses into a Schedule C style summary. It is not tax advice, and RaceYear is not a tax advisor. Whether racing expenses are deductible depends on whether your racing qualifies as a business rather than a hobby, which usually means operating as an LLC or DBA with a business plan. The IRS allows deductions that are "ordinary and necessary" for the industry. Review your situation and the summary with a tax professional before you file.
Emailing reports & receipts
Where in the app: Reports → Tax Summary → footer buttons; Additional income form → envelope icon
Get your numbers and your paperwork out of the app and into your inbox or your accountant's.
Email the Tax Summary
- On the Tax Summary tab tap Email Tax Summary. The summary for the selected year is emailed to your account address. A toast titled "Tax Summary 2026" shows the confirmation, or "Could not send email." if it failed.
Email a year of receipts
- Tap Email Receipts of this year. Every receipt photo you attached to items in that year is zipped and emailed to you (toast "Receipts of 2026").
Email a receipt for income you received
- In an Additional Income form, tap the envelope icon. The item is saved first, then you enter the recipient's email address and tap Send. Use it to send a sponsor a receipt for their payment.
Account
My Profile
Where in the app: Side menu → My Profile, or the profile icon on the Trips screen
Side menu → My Profile opens the My Account Profile screen with your account details, edition status and app preferences.
Sections
- Verify email red bar at the top of the screen with Send Again, shown until verified; afterwards an Email verified bar with a green mail icon appears under your email; the bar itself uses the normal panel background.
- MY RACETRIPS EDITIONS. Your current plan ("Free Trial" or your edition names), the trial progress strip while you are still on the trial (replaced by a red "You've created N more Trip Reports than your free trial allows." line once you go over, and gone once you own an edition), and a button: Unlock Unlimited with Premium on the trial or Unlock another year once you own an edition.
- MY NAME*. Required.
- EMAIL / USERNAME*. Read-only. Shows Email verified once confirmed.
- PASSWORD → Reset Password. Opens the Change Password dialog; enter a new password (6 characters minimum) and tap Submit. A "Password updated" toast confirms.
- MY RACE TEAM. Required. The label carries no asterisk, but an empty value blocks saving.
- MY PRIMARY RACE CLASS. Tap to open Search your Race Class; type to filter, then tap a class (name and description) to select it. Use the back arrow to leave without choosing.
- AI INSIGHTS: View AI Insights Messages. Switch RaceTrips AI suggestion cards on or off.
- SIGN OUT and DELETE ACCOUNT (see the next guides).
- App Version and server environment at the bottom.
Save changes
- Tap the green ✓ in the title bar. A "Profile updated" toast confirms. Name, team, race class and the AI switch are saved together and only when you tap ✓; toggling the switch alone does not save it. Password is saved from its own dialog.
Upgrade to Premium & purchases
Where in the app: Side menu → Upgrade to RaceTrips Premium, or any Get Premium / Upgrade button
Buy the edition for a tax year to unlock Season stats and Reports for that year. The screen is titled Upgrade to Premium during the trial and My Purchases once you own an edition.
Before you buy
- Your email must be verified. Otherwise the screen shows "To continue, you need to verify your email" with Send Again.
- Purchases go through the App Store (iOS) or Google Play (Android). In the web version, Buy Now shows Store issue: This product is currently not available in your region; buy in the iOS or Android app instead.
The purchases screen
- SUBSCRIPTION STATUS (trial only): your plan, the trial progress strip ("Your trial has N/8 Trip Reports remaining.", replaced by a red "You've created N more Trip Reports than your free trial allows." once you are over the limit), and the list of Premium benefits. Until you go over the limit it reads "You'll still be able to add trip reports after your trial expires. Be sure to upgrade to RaceTrips Premium for continued access to:"; once you are over the limit it reads "That's ok, though. You can still add more trip reports, but be sure to buy a paid plan to get all the benefits for your 2026 tax year:" (the current calendar year is inserted).
- RaceTrips Premium Editions. One row per available edition (for example "RaceTrips 2026 Edition") with Buy Now, or Active if you already own it.
Buy an edition
- Tap Buy Now. A spinner shows while the store sheet opens.
- Complete the purchase in the store sheet.
- RaceTrips verifies the purchase with the server, shows Congratulations! Purchase succesful (the app's own spelling), and opens My Profile with your new edition listed.
- If the store cannot supply the product you see Store issue: This product is currently not available in your region. Store errors show a Shop error dialog, and if the server cannot verify the receipt you see Purchase error. Cancelling the sheet simply returns you to the list.
After purchase
- The year's lock panels disappear from Season and Reports.
- The Trips headline panel stops counting trial reports.
- The year selectors include your new year.
Sign out, delete account & help
Where in the app: Side menu and My Profile
Sign out
- Side menu → Sign Out, or the power icon in My Profile → SIGN OUT. You return to the welcome screen. Your data stays on the server; log in again to see it.
Delete your account
- My Profile → DELETE ACCOUNT → tap the red user icon at the right of the Request Account Deletion row. It opens the account-deletion page on raceyear.app in your browser, where you can submit the request.
Get help
- Side menu → Tutorial Videos opens the step-by-step tutorials in this guide.
- Side menu → Help and Feedback opens this guide; start with Troubleshooting or Still need help?
- Side menu → Replay Product Tour replays the eight-page introduction.
Other RaceYear apps
- The side menu promotes RacePrep ("Manage your maintenance."). Download opens the store listing; in the web version it shows Not available: In the web environment there is no app store.
Your data and privacy
- Sign in anywhere. Your email is your username. Log in on a new phone and your trips are there; nothing is stored only on the device.
- Change your password from My Profile → Reset Password (6 characters minimum), or use Forgot Password on the login screen.
- Delete your account. My Profile → Request Account Deletion opens the delete account page, where you can request permanent deletion of your RaceTrips account and data.
- Privacy and terms. See the Privacy Policy and Terms & Conditions.
Reference
Icons & badges glossary
Where in the app: Throughout the app
Trip types (list icon and calendar dot color)
| Icon | Color | Meaning |
|---|---|---|
| Checkered flag | Green | Normal trip report |
| Rain cloud | Blue | Rainout day |
| Money transfer | Orange | Additional expense (no trip) |
| Dollar badge | Gold | Additional income (not prize money) |
| Warning triangle | Red | A report that still needs attention (missing items) |
Calendar days show up to six dots (three on narrow screens), one per entry on that day. Past days have a filled background; future days are outlined.
Under each trip in the list
Small grey icons summarize what has been logged on the trip: a trophy for prize money, a route for miles, and category icons such as bed (lodging), gas pump (race fuel), tire, ticket (pit pass), burger (meals), engine (parts). In a trip's Details list every item shows its category icon in green; in the Save-as-Template list, unticked items turn grey.
Position badges
- P3 (+7) on a trip header: finishing position, and places gained (+) or lost (−) from the start position.
- DNQ, RAIN, N/A: non-racing outcomes that record $0 prize money.
Locks
- Open lock (gold): the feature is available during your free trial; tap it to read about Premium.
- Closed lock (gold): your trial has ended and the feature needs an edition.
Bottom-bar badge
- A red number on Alerts is the count of trips missing prize money or travel distance.
Colors in charts
- Green income and prize money. Red expenses in the Cash Flow chart. Each expense and income category keeps one color across the pie charts and lists. Calendar dots use the entry's own trip-type color, not the category color.
Title-bar buttons
| Button | Action |
|---|---|
| ✓ (green) | Save |
| + (green) | Save and add another |
| Trash | Delete (asks to confirm) |
| Pencil | Edit trip basics (normal trips and rainouts only) |
| Envelope | Save and email a receipt (additional income) |
| Round user icon | Open My Profile |
Frequently asked questions
Is RaceTrips a subscription?
No. You buy a RaceTrips edition per tax year as a one-time in-app purchase. The free trial has no time limit; it is limited to a number of Trip Reports.
How many free Trip Reports do I get?
The trial includes 8 Trip Reports by default. The exact number is shown in your profile as "Your trial has N/8 Trip Reports remaining".
Do additional expenses and income use trial reports?
No. Only normal trip reports and rainouts count toward the trial.
I used all my trial reports. Can I keep logging?
Yes. You can keep adding trips, expenses, income and miles. Season stats and Reports stay locked until you buy the edition for that year.
Why is a year showing "Get Ready for YYYY!"?
You own an edition for another year but not this one. Buy the edition for the year you want to view.
Why can't I buy on the web?
Editions are sold only through the App Store and Google Play. Buy in the mobile app; your account unlocks everywhere you log in.
The Upgrade screen says I need to verify my email.
Open My Profile and tap Send Again on the red bar, then tap the link in the email.
How does Smart Scan work?
Take or choose a receipt photo. The AI reads the amount, merchant/name and date and fills in the form. Always review before saving. Scanning overwrites those three fields.
Why did the Category fill in by itself?
When you type an expense or income name you have used before, RaceTrips selects the category you used last time. Change it if needed.
How do I mark a race I did not qualify for or that was rained out?
Add prize money and tap Mark as DNQ, or choose RAIN or N/A as the start position. The amount becomes $0 and no finish position is needed.
What is the difference between Summary and Details on a trip?
Summary groups amounts by category. Details lists every individual item and lets you tap to edit.
What is a template?
A copy of a trip's expense items you can pre-load into a new trip. Create one from Save as a Template on a trip; delete them under Manage Templates.
Can I delete a tag from one trip only?
Deselect it in Edit Trip Report. Removing a tag in Manage Tags deletes it from every trip.
How do I get my numbers to my accountant?
On the Tax Summary tab tap Email Tax Summary and Email Receipts of this year.
Is RaceTrips tax advice?
No. It organizes your racing income and expenses in a Schedule C layout. Confirm deductibility with a tax professional.
How do I delete my account?
My Profile → Request Account Deletion opens the deletion request page.
Still need help?
If something is not working, or you cannot find the answer here, see Troubleshooting above or contact us. Telling us which app you are using, your device, and what you were doing when the problem happened helps us sort it out faster.